
출처: Shiny in Production: App and Database Syncing
페이스북을 들여다보다가 Shiny in Production: App and Database Syncing라는 제목의 R-bloggers의 글이 눈에 띄었다. 마침 요즘 Shiny도 조금씩 건드려 보고 있던 와중에 이게 무언가 하고 클릭을 해보니 꽤 괜찮은 내용이길래 한번 정리를 해보려 한다. R shiny와 DB를 동기화 하는 내용인데, 정리 하기전에 이 글의 원저자를 소개 하려고 한다. R-bloggers에서 찾았지만 이글의 원 저자는 Thomas Roh라는 사람이고 원문과 R-bloggers의 글을 같이 소개 한다.
- R-bloggers: Shiny in Production: App and Database Syncing
- 원문: Shiny in Production: App and Database Syncing
[DB Part] DB & Table 생성
우선 Shiny에 DB를 연결하기위해 다음 세개의 패키지를 불러오자. 그리고 나서 DB를 생성 하려고 한다. test_sqlite.sqlite라는 이름으로 생성 해주고 mytable이라는 이름으로 Table을 생성 해주었다. 먼저번에 Sqlite에 대해 포스팅을 한 적이 있는데 다음을 참고 하도록 하자.
library(shiny)
library(RSQLite)
library(DBI)
con <- dbConnect(SQLite(),
                 dbname = "test_sqlte.sqlite")

dbExecute(con, 'CREATE TABLE mytable (col1 int, col2 varchar(10));')
## [1] 0dbListTables(con)## [1] "mytable"[DB Part] 데이터 삽입
Test를 위해 우선 데이터를 넣어주자. 컬럼 두개에 각각 1과 ’a’를 넣어 주었다.
dbExecute(con, 'INSERT INTO mytable ([col1], [col2]) VALUES (1, "a");"')## [1] 1확인해보면 다음과 같이 나오게 된다.
dbGetQuery(con, 'SELECT col1, col2 FROM mytable')## col1 col2
## 1 1 a[R Shiny Part] Shiny에서 데이터 불러오기
Shiny를 하면서 처음에 가장어려웠던 부분중 하나가 R이랑 비교했을때 객체를 다루는 방법이 다르다는 점이었다. R과 다르게 Shiny에서는 reactive({})안에 감싸서 객체를 만들어 준다. (아직은 이렇게만 알고만 있다.) 이는 Shiny App에서 dbGetQuery(con, 'SELECT col1, col2 from mytable')를 사용해 mytableinshiny를 객체로 지정 해주는걸 의미한다.
mytableinshiny <- reactive({
  dbGetQuery(con, 'SELECT col1, col2 from mytable')
})
mytableinshiny()mytableinshiny()를 실행 시킨 결과는 다음과 같다.
##   col1 col2
## 1    1    b
[R Shiny Part] DB Input 환경 만들기
이제 Shiny에서 DB를 생성했으니, Application환경에서 DB에 Input할수있는 코드를 구현해보자. Shiny에서는 sqlInterpolate함수라는게 있어서 이를 사용하면 된다. sqlInterpolate함수에 쿼리문과, input코드를 넣어주자. input코드는 컬럼1과 컬럼2각각 준비 한다.
observeEvent(input$writetodb, {
  sql <- sqlInterpolate(con, 'INSERT INTO mytable ([col1], [col2]) VALUES (col1, ?col2);"',
                        col1 = input$col1, col2 = input$col2)
  dbExecute(con, sql)
})
[R Shiny Part] Data.frame 업데이트 구현
이제 Input으로 추가된 DB가 Data.frame에 구현 되도록 코드를 설정 해주자. 너무 어려운 개념인데, 이러한 것들 하나하나가 웹 개발에서는 익숙하다고 한다. 코드의 자세한 설명은 원문만 남기고 넘어가자.
After the database insertion, we need a way to inform shiny to update the reactive data.frame. We can use a reactive trigger to “push” a button that lets shiny know that the database has changed and it should re-execute the SELECT query.
makereactivetrigger <- function() {
  rv <- reactiveValues(a = 0)
  list(
    depend = function() {
      rv$a
      invisible()
    },
    trigger = function() {
      rv$a <- isolate(rv$a + 1)
    }
  )
}
dbtrigger <- makereactivetrigger()
[R Shiny Part] 데이터 Insert후 Shiny에 전달
이번에도 원문과 같이 설명한다. 지금까지 R Shiny Part에 사용했던 코드에 trigger개념을 추가하여 확장한 코드이다. 이 반응형 trigger를 사용하여 버튼을 통해 데이터가 변경 되고, 다시 SELECT문을 사용해 Data.frame를 표현 하게 된다.
The trigger is now an object that has a couple of functions to pass messages around. We need to set the reactive value to re-execute so add the depend function and after the database interaction executes we add the trigger function. Also, it’s good practice to use sqlInterpolate to help prevent sql injection attacks.
mytableinshiny <- reactive({
  dbtrigger$depend()
  dbGetQuery(con, 'SELECT col1, col2 from mytable')
})

observeEvent(input$writetodb, {
  sql <- sqlInterpolate(con, 'INSERT INTO mytable ([col1], [col2]) VALUES (?col1, ?col2)',
                        col1 = input$col1, col2 = input$col2)
  dbExecute(con, sql)
  dbtrigger$trigger()
})
최종 코드
지금껏 DB파트와 Shiny파트, 그리고 Shiny에서 trigger를 사용해 Shiny App의 부분을 알아보았다. 이 코드들을 다 합쳐서, Shiny에서 DB와 연동 하는 코드가 다음과 같다. 이를 Shiny 실행하기 위해서는 간단하게 app.R이라고 명명된 R파일에서 실행을 해주면 된다.
library(shiny)
library(RSQLite)
library(DBI)
makereactivetrigger <- function() {
    rv <- reactiveValues(a = 0)
    list(
        depend = function() {
            rv$a
            invisible()
        },
        trigger = function() {
            rv$a <- isolate(rv$a + 1)
        }
    )
}
dbtrigger <- makereactivetrigger()
con <- dbConnect(RSQLite::SQLite(), ":memory:")
dbExecute(con, 'CREATE TABLE mytable (col1 int, col2 varchar(10));')
ui <- fluidPage(
    numericInput('col1', 'col1', value = 1L, step = 1L),
    textInput('col2', 'col2', value = 'a'),
    actionButton('writetodb', 'Save'),
    tableOutput('dbtable')
)
server <- function(input, output) {
    mytableinshiny <- reactive({
        dbtrigger$depend()
        dbGetQuery(con, 'SELECT col1, col2 from mytable')
    })
    observeEvent(input$writetodb, {
        sql <- sqlInterpolate(con, 'INSERT INTO mytable ([col1], [col2]) VALUES (?col1, ?col2)',
                              col1 = input$col1, col2 = input$col2)
        dbExecute(con, sql)
        dbtrigger$trigger()
    })
    output$dbtable <- renderTable({
        mytableinshiny()
    })
}
shinyApp(ui = ui, server = server)
Shiny 실행 결과
위 코드를 실행한 Shiny 실행 결과를 보도록 하자.
Main
Shiny의 메인 화면이다. 컬럼 두개가 존재하고, 각각 1, ’a’로 지정된 Data.frame가 보인다. 이곳에서 하나씩 입력하여 Save버튼을 클릭해보자. Shiny에서 입력한 결과가 DB에 잘 저장이 되었는지 확인 하는 과정이다.

Sqlite생성 확인
우선 Sqlite DB가 생성된것을 확인할 수 있었다. 이제 실제 DB에도 잘 적용되었는지 확인해보도록 하자.

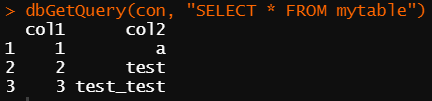
Table 확인
mytable Table를 확인해보자. Shiny App에서 입력했던 데이터가 여기 DB에 그대로 잘 적용된 것을 확인할수 있다.
총평
이번에는 R Shiny와 DB를 동기화 하는 블로그를 써보았다. 단순히 R코드에 익숙해져있다가 Shiny를 하면서 어려움이 많았는데, 추가로 DB를 연동하는것 까지 알게 되었다. 처음에는 DB연동이 막연하게 그냥 되겠지 라고 생각만 했다면 이번 계기로 웹개발이 이렇게 복잡?하구나 라는것도 알게 되었다.